
Multi-Head Attention Layer
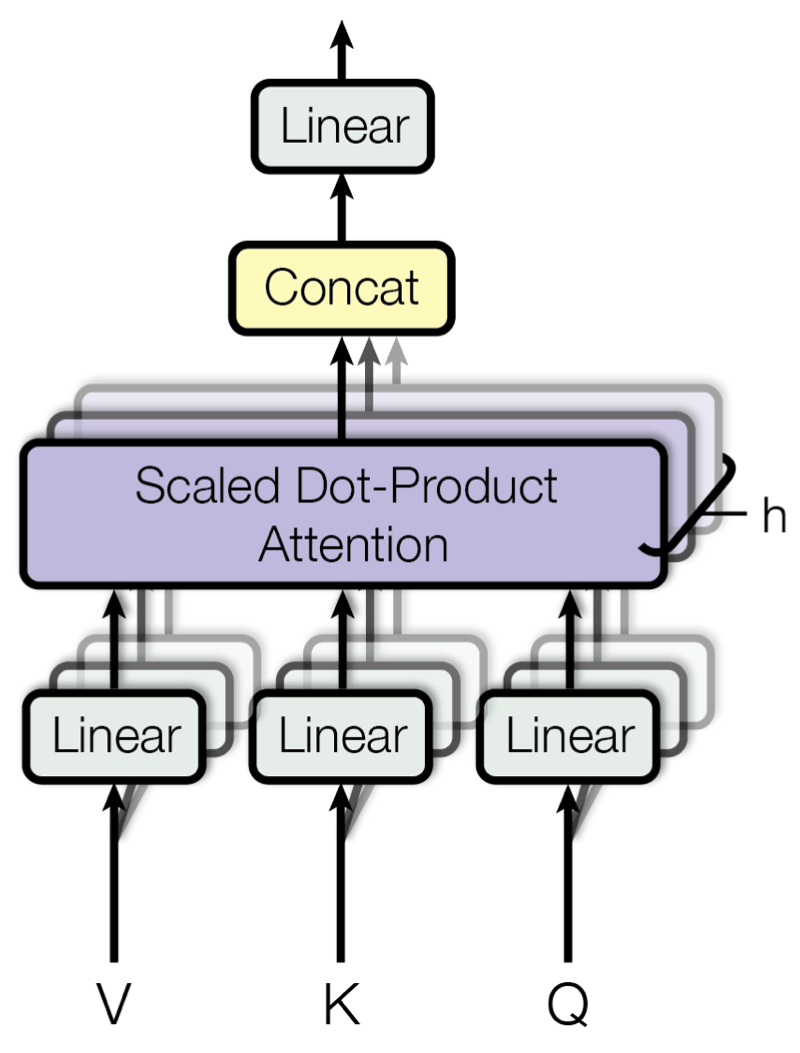
지금까지의 Self-Attention에 대한 개념은 모두 Multi-Head Attention Layer를 이해하기 위한 것이었다. Attention 계산을 논문에서는 Scaled Dot-Product Attention이라고 명명한다. Transformer는 Scaled Dot Attention을 한 Encoder Layer마다 1회씩 수행하는 것이 아니라 병렬적으로 h회 각각 수행한 뒤, 그 결과를 종합해 사용한다. 이 것이 Multi-Head Attention이다. 이러한 연산을 수행하는 이유는 다양한 Attention을 잘 반영하기 위해서이다. 만약 하나의 Attention만 반영한다고 했을 때, 예시 문장에서 ‘it’의 Attention에는 ‘animal’의 것이 대부분을 차지하게 될 것이다. 하지만 여러 종류의 attention을 반영한다고 했을 때 ‘tired’에 집중한 Attention까지 반영된다면, 최종적인 ‘it’의 Attention에는 ‘animal’이라는 지칭 정보, ‘tired’ 이라는 상태 정보까지 모두 담기게 될 것이다. 이 것이 Multi-Head Attention을 사용하는 이유이다.
구체적인 연산 방법을 살펴보자. 논문에서는 h=8을 채택했다. Scaled Dot-Product Attention에서는 Q, K, V 를 위해 FC layer가 총 3개 필요했었는데, 이를 h 회 수행한다고 했으므로 3∗h 개의 FC layer가 필요하게 된다. 각각 연산의 최종 output은 n×dk 의 shape인데, 총 h 개의 n×dk matrix를 모두 concatenate해서 n×(dk∗h)의 shape를 갖는 matrix를 만들어낸다. (n은 token의 개수로, 사실상 seq_len 이다. notation의 단순화를 위해 n으로 잠시 변경한다.) 이 때 $d_{k}$ * x의 값을 $d_{model}$로 명명한다. $d_{model}$=$d_{k}$∗h 수식은 실제 코드 구현에서 매우 중요한 개념이므로 꼭 기억하고 넘어가자. 대개 $d_{model}$ Encoder의 input으로 들어오는 shape인 $d_{embed}$와 동일한 값을 사용한다. $d_{model}$과 $d_{embed}$의 구분이 어렵다면, 사실상 서로 동일한 값이라고 봐도 무방하다.
# Multiheadattention
class MultiHeadAttentionLayer(nn.Module):

    def __init__(self, d_model, h, qkv_fc, out_fc):
        super(MultiHeadAttentionLayer, self).__init__()
        self.d_model = d_model
        self.h = h
        self.q_fc = copy.deepcopy(qkv_fc)
        self.k_fc = copy.deepcopy(qkv_fc)
        self.v_fc = copy.deepcopy(qkv_fc)
        self.out_fc = out_fc

       def forward(self, *args, query, key, value, mask=None):
        # query , key, value : (n_batch, seq_len, d_embed)
        # mask : (n_batch, seq_len, seq_len)
        # return value : (n_batch, h, seq_len, d_key)

        n_batch = query.size(0)

        def transform(x, fc):  # (n_batch, seq_len, d_embed)
            out = fc(x)
            out = out.view(
                n_batch, -1, self.h, self.d_model // self.h
            )  # (n_batch, seq_len, h, d_k)
            out = out.transpose(1, 2)  # (n_batch, h, seq_len, d_k)

            return out

        query = transform(query, self.q_fc)
        key = transform(key, self.k_fc)  # (n_batch, h, seq_len, d_k)
        value = transform(value, self.v_fc)  # (n_batch, h, seq_len, d_k)

        out = self.calculate_attention(
            query, key, value, mask
        )  # (n_batch, h, seq_len, d_k)
        out = out.transpose(1, 2)  # (n_batch, seq_len, h, d_k)
        out = out.contiguous().view(
            n_batch, -1, self.d_model
        )  # (n_batch, seq_len, d_model)
        out = self.out_fc(out)  # (n_batch, seq_len, d_embed)

        return out
Decoder
Decoder 역시 Encoder와 마찬가지로 N개의 Decoder Block이 겹겹이 쌓인 구조이다. 이 때 주목해야 하는 점은 Encoder에서 넘어오는 context가 각 Decoder Block마다 input으로 주어진다는 것이다. 그 외에는 Encoder와 차이가 전혀 없다.
Decoder Block은 Encoder Block과 달리 Multi-Head Attention Layer가 2개가 존재한다. 첫번째 layer는 Self-Multi-Head Attention Layer라고 부르는데, 이름 그대로 Decoder의 input으로 주어지는 sentence 내부에서의 Attention을 계산한다. 이 때, 일반적인 pad masking뿐만 아니라 subsequent masking이 적용되기 떄문에 Masked-Multi-Head Attention Layer라고 부르기도 한다. 두번째 layer는 Encoder에서 넘어온 context를 Key, Value로 사용한다는 점에서 Cross-Multi-Head Attention Layer라고 부른다. 즉, Encoder의 context는 Decoder 내 각 Decoder Block의 Cross-Multi-Head Attention Layer에서 사용되게 된다. 마지막 Position-wise Feed-Forward Layer는 Encoder Block의 것과 완전히 동일하므로 설명을 생략한다. 이제 두 Multi-Head Attention Layer에 대해서 Encoder의 것과 비교하며 특징을 살펴보자.
Cross-Multi-Head Attention Layer
Decoder의 가장 핵심적인 부분이다. Decoder Block 내 이전 Self-Multi-Head Attention Layer에서 넘어온 output을 input으로 받는다. 여기에 추가적으로 Encoder에서 도출된 context도 input으로 받는다.
두 input의 사용 용도는 완전히 다르다. Decoder Block 내부에서 전달된 input(Self-Multi-Head Attention Layer의 output) 은 Query로써 사용하고, Encoder에서 넘어온 context는 Key와 Value로써 사용하게 된다. 이 점을 반드시 기억하고 넘어가자.
우리가 Decoder에서 도출해내고자 하는 최종 output은 teacher forcing으로 넘어온 sentence와 최대한 유사한 predicted sentence이다. 따라서 Decoder Block 내 이전 layer에서 넘어오는 input이 Query가 되고, 이에 상응하는 Encoder에서의 Attention을 찾기 위해 context를 Key, Value로 두게 된다. 번역 task를 생각했을 때 가장 직관적으로 와닿는다. 만약 영한 번역을 수행하고자 한다면, Encoder의 input은 영어 sentence일 것이고, Encoder가 도출해낸 context는 영어에 대한 context일 것이다. Decoder의 input(teacher forcing)과 output은 한글 sentence일 것이다. 따라서 이 경우에는 Query가 한글, Key와 Value는 영어가 되어야 한다.
Transformer's Input ( Positional Encoding )
Transformer는 source / target sentence에 대한 각각의 Embedding이 포함된다. Transformer의 Embedding은 단순하게 Token Embedding과 Positional Encoding의 sequential로 구성된다. code는 단순하다.
class TransformerEmbedding(nn.Module):

    def __init__(self, token_embed, pos_embed):
        super(TransformerEmbedding, self).__init__()
        self.embedding = nn.Sequential(token_embed, pos_embed)


    def forward(self, x):
        out = self.embedding(x)
        return out
Token Embedding 역시 단순하다. vocabulary와 $d_{embed}$ 를 사용해 embedding을 생성해낸다. 주목할 점은 embedding에도 scaling을 적용한다는 점이다. forward()에서 $\sqrt{d_{embed}}$ 를 곱해주게 된다.
class TokenEmbedding(nn.Module):

    def __init__(self, d_embed, vocab_size):
        super(TokenEmbedding, self).__init__()
        self.embedding = nn.Embedding(vocab_size, d_embed)
        self.d_embed = d_embed


    def forward(self, x):
        out = self.embedding(x) * math.sqrt(self.d_embed)
        return out
Positional Encoding
class PositionalEncoding(nn.Module):

    def __init__(self, d_embed, max_len=256, device=torch.device("cpu")):
        super(PositionalEncoding, self).__init__()
        encoding = torch.zeros(max_len, d_embed)
        encoding.requires_grad = False
        position = torch.arange(0, max_len).float().unsqueeze(1)
        div_term = torch.exp(torch.arange(0, d_embed, 2) * -(math.log(10000.0) / d_embed))
        encoding[:, 0::2] = torch.sin(position * div_term)
        encoding[:, 1::2] = torch.cos(position * div_term)
        self.encoding = encoding.unsqueeze(0).to(device)


    def forward(self, x):
        _, seq_len, _ = x.size()
        pos_embed = self.encoding[:, :seq_len, :]
        out = x + pos_embed
        return out
code가 다소 난해할 수 있는데, 직관적으로 작동 원리만 이해하고 넘어가도 충분하다. PositionalEncoding의 목적은 positional 정보(token index number 등)를 정규화시키기 위한 것이다. 단순하게 index number를 positionalEncoding으로 사용하게 될 경우, 만약 training data에서는 최대 문장의 길이가 30이었는데 test data에서 길이 50인 문장이 나오게 된다면 30~49의 index는 model이 학습한 적이 없는 정보가 된다. 이는 제대로 된 성능을 기대하기 어려우므로, positonal 정보를 일정한 범위 안의 실수로 제약해두는 것이다. 여기서 sin 함수와 cos 함수를 사용하는데, 짝수 index에는 sin 함수를, 홀수 index에는 cos 함수를 사용하게 된다. 이를 사용할 경우 항상 -1에서 1 사이의 값만이 positional 정보로 사용되게 된다.
구현 상에서 유의할 점은 생성자에서 만든 encoding을 forward() 내부에서 slicing해 사용하게 되는데, 이 encoding이 학습되지 않도록 requires_grad=False 을 부여해야 한다는 것이다. PositionalEncoding은 학습되는 parameter가 아니기 때문이다.
이렇게 생성해낸 embedding을 Transformer에 추가해주자. code를 수정한다. forward() 내부에서 Encoder와 Decoder의 forward()를 호출할 때 각각 src_embed(src), tgt_embed(tgt)와 같이 input을 TransformerEmbedding으로 감싸 넘겨준다.